Using a router on construction board (e.g. “Wedi”) to make a beveled corner

First of all, is my terminology correct? These are brands of synthetic wood alternatives:

Is “construction board” the generic name for this stuff? I think some people call them “building panels”. I ask because my search for Invidious (Youtube) vids came up short. I would rather not have a brand-dependent search query because I have to try many queries as it is to try to get this answer.

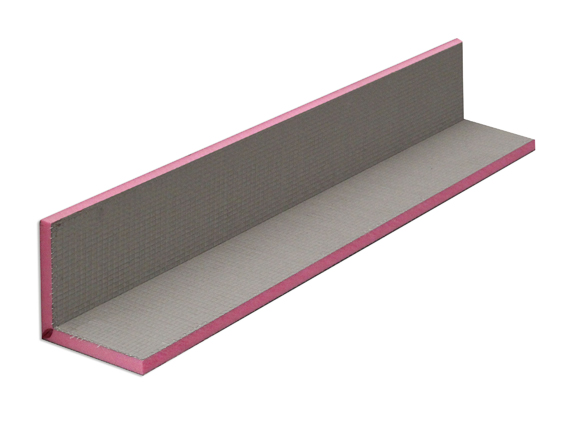
Qboard offers a factory made corner piece (called Qorner; attached to this post). I was trying to work out how I could do that myself. I’ve never worked with , nor have I used a router, but I suspect they use a router to cut a “V” in the board without competely bottoming out (but nearly), so the outer skin does not get cut. Has anyone done this?

punkskunk ,

[Thread, post or comment was deleted by the author]

  • Loading...
  • ciferecaNinjo OP , (edited )

    Thanks for the feedback.

    While you could cut a V and bend the board, I would not trust it to be waterproof and you would need to seal it with the sealant anyway

    I think this is where the different kinds of boards differ. Some tests¹ demonstrate Wedi is not waterproof but Schluter KERDI and another brand is. This guy says KERDI board can be scored and snapped to fit into a car, and unfolded at installation and it maintains its waterproof properties.

    If I opt for foam board then it would probably be Wedi so indeed it would theoretically need a waterproofing system on top. I say theoretically because I don’t think the shower is waterproof to begin with (it’s apparently tile directly on concrete rendered over brick). But I should still probably practice doing it right.

    it would probably be stronger to just do a butt joint with sealant.

    I’ve noticed construction board is fastened using a big washer of sorts and a screw through it. If the board is 10—15mm thick and I use those washers on a corner, they would overhang. I suppose I could cut the overhung portions off with an angle grinder. I’m also unclear on how strong the joint is if a screw is driven just into the foam to fasten the butt joint. Wouldn’t the screw pull out without much force? Perhaps I’ll use a 2×3cm piece of wood on the inside corner and screw both boards to that since I have that wood on hand.

    Or when you say “with sealant”, do you mean no screws and sealant alone?

    1. not sure I linked the right video.. I can’t access videos right now to verify.
    3hax6ejo ,

    Does the shutoff valve have to be in the shower? Could it be moved to the other side of a wall outside of the shower? The seems like the best long term solution, especially since you have to deconstruct the concrete block it’s embedded in anyway.

    From what I know of all of the “wet area” products you mentioned, you can cut the materials quite easily and put pieces together to build whatever you want. Once you have the walls and other structures put together, you have to tape and seal all of the joints to prevent water leaks. All of these products have tape/sealant specific to the product line.

    ciferecaNinjo OP ,

    Does the shutoff valve have to be in the shower? Could it be moved to the other side of a wall outside of the shower?

    The valve joins a steel pipe to PEX. Both pipes are still bedded in concrete even though I cleared away the concrete that the valve was embedded in. The valve could be moved but the pipe joints remain in place because it would be too big of a project to unbury all of it, cut the steel pipe & thread it, etc. So if I move the valve the box would still need to be accessible in case the joints fail.

    I need to update that other thread. I’ve already drilled a 14mm hole in the wall and ran a shaft through it which is now attached to a right angle gearbox mounted on the new valve, which has a replaceable cartridge. So what’s left to do is getting a custom handle on the shaft that goes through the wall and I need to build the box.

    canni ,

    If you’re gonna buy and use power tools, just use regular construction materials. MDF is pressed wood fibers, cheap, reliable. It’s what all the Ikea stuff is made of.

    If it’s just mockups, you could use something like “rigid pink foam” from a vendor like Owens Corning. If you can detail what you’re trying to do I might be able to be more helpful.

    ciferecaNinjo OP , (edited )

    I’m building a small box in the shower which I will tile over. The box will cover a valve and must be semi-accessible. The valve will actually be controlled from the other side of the wall, so the box need not be opened routinely -- only if the fitting leaks or goes bad will access be needed.

    I have an unlimited free supply of Ikea pressboard because neighbors throw it away daily. But I would not use it in a shower. Ikea pressboard is like a sponge with water. It’s also too thick. I have rigid space constraints. No limit on the box height, but the walls of the box must be thin (e.g. 10—15mm thick is what I have in mind). The construction board seems well suited for wet areas.

    This is the old box, which was previously a solid block of concrete:

    https://fedia.io/m/plumbing/t/58279/Advice-needed-exposed-water-valve-in-shower

    My building style is to make everything accessible and servicable. So in that pic you see a floor tile around the box. That tile is actually removable. I went to great lengths to give a solid mating subfloor but without gluing it down. So if needed I can just remove the caulking around that tile and get under the showerpan. This is why the box walls must be thin. If the box is big enough to overlap the floor tile, then it would ruin the accessibility of the floor tile. Unless I somehow figure out how to make the entire box easily removable.. then it wouldn’t matter if it rested on the floor tile.

    akincisor ,
    @akincisor@lemmy.world avatar

    If it’s going to be in the shower, I can’t recommend MDF or even plywood. Probably better to go with solid wood if you can, or even better if you can access a 3D printer, use that.

    ciferecaNinjo OP , (edited )

    Probably good advice, but I should note that I’ve been in several home improvement stores the past few days and they all have green particle board. One even had green plywood. I’ve seen how conventional particle board becomes like a sponge to water, so it’s a bit surprizing that they can treat it well enough to make it suitable for moist environments.

    I told a salesman that although I would prefer a foam cement board Wedi type of thing, it’s too expensive. He then suggested the green particle board. It looks like they soaked the sawdust so that every spec of wood gets the water-resistent treatment before pressing it together. So perhaps it would be good for this.

    I’m currently leaning toward using sticks of green (treated) solid wood for the frame, and ordinary drywall for the surface because I have this on hand. Then I would smother the whole thing in a liquid rubber of sorts. The particular liquid rubber I would use is most common in roofing but they advertize that tiles can be glued to it.

    (edit) The liquid rubber brocure lists things it can be applied to.

    “To be applied on bituminous foundations and on the most common construction materials such as concrete, stone, wood, steel, aluminium, cement plaster and polyester”

    Hmm.. no mention of drywall. So perhaps I will need to make it entirely from wood before using the liquid rubber on it.

    canni ,

    I don’t have a lot of experience working in the wet part or a bathroom. I believe I saw a friend frame out a shower and then cover it with cement board once and then tile over it, so that may be an option, but take that advice with a grain of salt.

  • All
  • Subscribed
  • Moderated
  • Favorites
  • random
  • [email protected]
  • All magazines